Can You Make Espresso in an Aeropress? Kind of…

Making espresso at home is a dream for many coffee lovers, but the reality is that true espresso machines are prohibitively expensive for most people. Not only that, but dialing in the perfect espresso shot can be a frustrating and time-consuming endeavor. That’s why the Aeropress, a humble little coffee brewer, has become a favorite among those seeking an espresso-like experience without the steep investment or steep learning curve.
While Aeropress concentrate isn’t technically espresso, it’s close enough to scratch that itch for many of us. And let’s be honest, most of us aren’t looking to become world-class baristas anyway—we just want a tasty, concentrated coffee that we can enjoy at home without breaking the bank or pulling our hair out.
In this guide, I’ll walk you through everything you need to know about making delicious “espresso” in your Aeropress. So grab your Aeropress, some freshly roasted beans, and let’s get brewing!
Can You Make Real Espresso in an Aeropress?
Let’s get one thing out of the way upfront: no, you cannot make true espresso in an Aeropress. By definition, espresso is a concentrated coffee beverage brewed by forcing hot water through finely-ground coffee beans using high pressure—generally 9 or more bars of pressure. The Aeropress simply doesn’t have the capability to generate that kind of pressure.
True espresso machines use a combination of steam pressure and a motorized pump to force nearly-boiling water through a tightly packed “puck” of ground coffee at those high pressures. This rapid extraction process results in a thick, syrupy beverage with a rich, concentrated flavor and a beautiful crema (that frothy golden-brown foam on top).
While the Aeropress can brew a concentrated coffee that shares some similarities with espresso, it does so through an immersion brewing process more akin to French press or cupping methods. The coffee grounds steep in hot water for a short period, after which you use gentle air pressure (created by pressing the plunger) to force the concentrated brew through a filter and into your cup.
So no, the coffee you make in an Aeropress is not technically “real” espresso. It’s more of an espresso “adjacent.” What really matters is that the Aeropress can produce a thick, syrupy, concentrated coffee with deep, rich flavors that absolutely scratches that espresso itch for a fraction of the cost of a proper espresso setup.
The key advantage of the Aeropress isn’t just the low price tag (though that’s a huge perk). It’s also an incredibly forgiving and simple brewing method compared to dialing in true espresso. Mastering espresso takes weeks or months of practice and obsessive attention to detail, and it frequently results in channeling, sour shots, and other frustrations while you’re learning. With the Aeropress? If you follow instructions, you’ll get a great concentrated brew pretty much every time.
How Does Aeropress Coffee Differ from Espresso?
While Aeropress concentrate shares some qualities with true espresso, there are also some key differences to be aware of.
Brewing Method: As mentioned, espresso is brewed using high pressure (9+ bars) to force hot water through a tightly packed puck of finely ground coffee rapidly. The Aeropress uses an immersion brewing method where the grounds steep in hot water for a short period before gentle air pressure forces the concentrated brew through a filter. This results in a different extraction process compared to espresso.
Texture: True espresso has a thick, syrupy body and velvety mouthfeel thanks to the high pressure extraction. It also has a beautiful, persistent crema thanks to the emulsification of oils during the extraction process. Aeropress coffee can achieve a nice viscosity and mouthfeel, but it won’t have quite the same thick, syrupy texture as espresso, nor will it produce true crema (though you may get a nice foam cap).
Flavor: Espresso has a deep, intense, and concentrated flavor profile. The rapid high-pressure extraction results in more dissolved solids and oils in the cup, contributing to espresso’s robust, almost syrupy taste and mouthfeel.
Aeropress coffee can also achieve deep, rich flavors, but they tend to be a bit brighter and lighter-bodied compared to true espresso. The slower immersion brew doesn’t extract quite as much from the grounds.
With that being said, both beverages offer a concentrated punch of flavor compared to standard drip coffee. With the right beans and some simple adjustments (which we’ll cover later), you can absolutely brew Aeropress concentrate with deep, rich, espresso-forward flavor notes.
Caffeine Content: Ounce for ounce, espresso actually has slightly less caffeine than Aeropress coffee or drip brew. The rapid extraction doesn’t allow as much caffeine to dissolve compared to longer immersion brews. However, the concentrated nature of both beverages means you’re still getting a solid caffeine kick in a relatively small volume.
Ease of Preparation: No contest here—the Aeropress is basically idiot-proof compared to dialing in perfect espresso shots on an espresso machine. With the Aeropress, as long as you start with good beans, use proper ratios, and follow a few basic steps, you’ll get excellent results pretty much every time, and all you’ll need to dial in is your grind size. Mastering espresso takes incredible patience and, often, weeks of practice.
How to Make Espresso in Aeropress
Ready to get brewing? Here’s everything you need to make delicious “espresso” concentrate with your humble Aeropress:
Materials Needed:
- Aeropress (I prefer the original model, but the newer versions work too)
- Quality burr grinder
- Freshly roasted coffee beans
- Hot water kettle (a good gooseneck kettle makes it easier, but any kettle works)
- High-quality coffee scale (0.1g resolution is ideal for weighing beans)
Ingredients:
- Fresh, quality coffee beans (look for a medium-dark or dark roast for best results)
- Filtered water or spring water
Step-by-Step Brewing Instructions:
- Weigh out your coffee beans and grind them fresh to a bit coarser than an espresso grind. You’re looking at somewhere between table salt and powdered sugar when it comes to particle size. I recommend a 13g to 14g dose of beans for a concentrated single “shot.” Increase to 18g to 20g for a double.
- Rinse the Aeropress filter cap with hot water to pre-heat it, then set it aside. You can also let it sit in hot water while you work.
- Boil your water and allow it to stop boiling for 30 to 45 seconds (this allows it to drop to the ideal brewing temperature for Aeropress of around 200 degrees (F). If you have a good kettle with a built-in thermometer, rely on that instead.
- Insert the rinsed filter into the filter cap and tightly screw the cap onto the bottom of the Aeropress chamber. Place the Aeropress on a sturdy mug or cup and put your freshly ground coffee in the chamber.
- Gently pour just enough hot water over the grounds to saturate them (around 30g) and give it a gentle stir with a bamboo stir stick or the included stirring paddle to incorporate any dry pockets of grounds.
- Allow the coffee to bloom for 30 seconds, then gently pour in the remaining water to hit your desired brew ratio. I find a 1:13 to 1:16 ratio works great (so 208 to 224g water for 13 to 14g coffee). Give it another gentle stir.
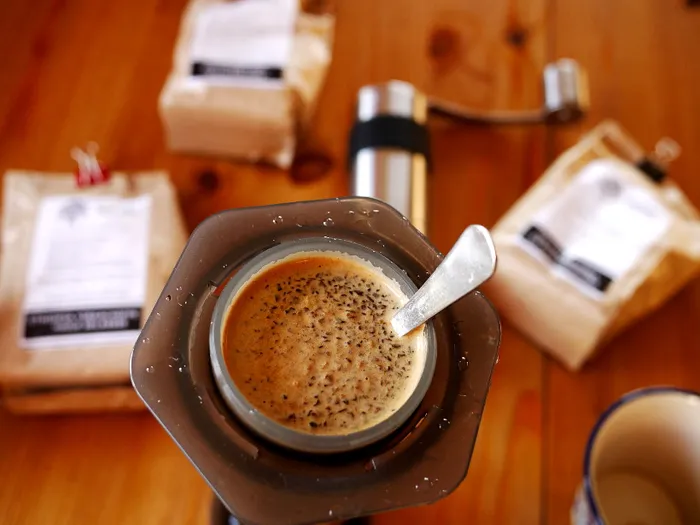
- Allow the coffee to steep for 2 to 2.5 minutes, gently swirling the Aeropress halfway through. The water should appear thick, syrupy, and very dark during this stage.
- Once the brew time is up, give it one more gentle swirl. Then, insert the plunger and very slowly begin pressing down with steady, even pressure. This should take roughly 30 to 45 seconds of constant, gentle pressure.
- As you press, the concentrated coffee will begin emerging through the filter into your cup below. Stop pressing once you hear a gentle hissing sound (this indicates air has started entering the chamber).
- Carefully remove the filter cap and plunger. Enjoy your fresh, concentrated “espresso” as is, or add dairy and sweeteners as desired.
And that’s it! Simple as can be, but capable of producing stunningly rich, full-flavored concentrated coffee worthy of the espresso name. Of course, this is just a starting point – your first few brews likely won’t be perfect. That’s where tinkering comes in.
How to Dial in Your Aeropress Espresso Recipe
If your first few attempts at Aeropress espresso didn’t quite hit the mark, don’t despair! Dialing in that perfect concentrated brew takes a little practice and fine-tuning. The beauty of the Aeropress is that you can easily make small tweaks to your recipe to shape the flavor and mouthfeel until you achieve exactly what you’re aiming for. Below are some of the key variables you can adjust.
Change the Grind Size
Grind size plays a critical role in flavor extraction for any brew method, but it’s especially important for concentrated methods like espresso and Aeropress brewing. The finer the grind, the more surface area is exposed to the hot water during extraction. Too coarse and you’ll underextract; too fine and you’ll overextract and potentially clog your filter.
For Aeropress concentrate, you want a fine grind that clumps together when pinched—finer than a typical drip grind, but not quite as fine as true espresso grind. Think somewhere between table salt and powdered sugar in consistency.
If your coffee tastes sour, astringent, or underdeveloped, you likely need to go finer on your grind size. This exposes more surface area for better extraction. You’ll get more intense flavor but may also extract some harsher, more bitter compounds if you go too fine.
Conversely, if your coffee tastes bitter, harsh, or overly roasty, try going a bit coarser on your grind. This limits extraction and helps rein in those overextracted flavors while still providing rich, developed notes.
Small grind size adjustments can have a big impact. I recommend making incremental changes of just a few “steps” at a time on your grinder until you zero in on that sweet spot.
Change the Steeping Time
In addition to grind size, the amount of time the grounds spend steeping in hot water is a key extraction variable that dramatically affects the resulting cup’s flavor.
With espresso brewing, the high pressure facilitates ultra-rapid extraction that happens in just 20 to 30 seconds. Aeropress brewing still happens fairly quickly, but that 1.5 to 2.5 minute steep gives you a bit more control over the extraction process.
A shorter steep (under 2 minutes) will result in more underdeveloped, acidic flavors in your cup as the grounds don’t have time to extract fully. Go longer (3+ minutes) and you risk over-extracting, bringing out harsh, dry, bitter, and astringent notes.
That 2 to 2.5 minute range seems to be the sweet spot for Aeropress concentrate, giving you deep, rich flavors without crossing over into sourness or bitterness. But it’s just a starting point—every coffee is different.
If your cup tastes sour or salty, increase the steep time in 15 to 30 second increments until those flavors round out. If it’s tasting harsh, dry, or dusty, try shortening the steep a bit to limit extraction. Just make small adjustments until you find that perfect brew time.
Change How Long You Stir
You might not think stirring would have much impact on flavor, but with the Aeropress’s immersion brewing style, that agitation plays a key role in how evenly and thoroughly the grounds extract.
During the brew, give the Aeropress a gentle stir every 30 seconds or so. This helps incorporate any straggling dry grounds, prevents channeling, and promotes even extraction. A good 10 to 15 second stir after the bloom and again midway through the steep can make a big difference.
If you don’t stir at all, you’ll likely end up with an uneven, imbalanced extraction as some areas of the bed are under-extracted while others are over-extracted. This can result in harsh, astringent, and underdeveloped notes all battling in the same cup.
On the flip side, stirring too vigorously or for too long can cause too much interaction between the grounds and the water, increasing the rate of extraction. You may also accidentally over-agitate the bed, resulting in fines passing through the filter more easily and contributing harsher, drier flavors.
Start with two gentle 10 to 15 second stirs: one after the bloom and another halfway through the steep. Adjust from there based on your results. If you’re picking up unevenness or some underdeveloped notes, give it a few extra stirs. If it’s tasting harsh, dry, or gritty, try reducing agitation.
Adjust Your Pressure
With a true espresso machine, you rely on a potent combination of steam pressure and an electric pump to generate 9 or more bars of pressure, rapidly forcing water through tightly-packed ground coffee. This high pressure leaves significantly more dissolved solids in your cup (including oils and micro-fines) compared to immersion brewing.
The increased solids translate to espresso’s rich, velvety body and mouthfeel. The finer grind size combined with the high pressure also helps create that beautiful, persistent crema on top—tiny micro-bubbles of those emulsified oils and suspended solids.
The Aeropress simply cannot generate anywhere near that kind of pressure. By most estimates, you’re only achieving around 1 to 2 bars of pressure by slowly depressing the plunger.
This significantly lower pressure results in a different flavor profile and texture compared to true espresso. You get plenty of rich, robust coffee notes, but not quite that same thick, syrupy concentration. And while you’ll get a nice foam cap, it won’t be true, long-lasting crema.
However, you can actually use this low pressure to your advantage when fine-tuning your Aeropress recipe. By adjusting how quickly or slowly you depress the plunger, you’re subtly altering the pressure and flow rate, which affects extraction.
Press very slowly with gentle, even pressure over 45 to 60 seconds, and you’ll achieve minimal turbulence and a slower, more efficient extraction. This can help limit the extraction of harsher, more bitter compounds while still getting plenty of rich flavor.
Conversely, if you press quite hard and get down into the 10 to 15 second range, you’ll increase the pressure and turbulence, leading to a more aggressive extraction. This extra “kick” can help coax out even more intense flavors from the grounds.
My advice? Start by pressing with steady, even pressure over 30 to 45 seconds as a baseline. If your coffee is tasting a bit underdeveloped or hollow, try pressing more slowly over a longer period. If it’s harsh or bitter, press a little faster to limit extraction.
Just be gentle and avoid pressing in quick bursts, as that turbulent flow can disrupt the bed and cause channeling or push more fines through the filter and into your cup.
Choose Your Filter Carefully
Filter choice is another often overlooked factor that can significantly affect the body, clarity, and flavor of your Aeropress espresso. The Aeropress comes standard with paper filters, but you can also opt for a reusable stainless steel mesh filter if you prefer.
Paper filters are highly efficient at removing even the finest coffee particulates from your brew. This produces an exceptionally clean, grit-free cup. However, the paper also absorbs many of the delicious natural oils found in coffee, as well as other compounds, like diterpenes and chlorogenic acids.
While those oils don’t necessarily contribute much in the way of flavor, they do add substantial body and mouthfeel. With paper filters, you’ll get a slightly thinner, lighter-bodied concentrate as a result of those trapped compounds.
Stainless steel mesh filters, on the other hand, allow more of those fine particulates and precious oils to pass through into your cup. This gives you a richer, fuller-bodied, almost creamy mouthfeel thanks to those suspended solids and emulsified oils.
The trade-off is that stainless filters don’t remove as much sediment, so you’ll get a grittier cup with some very fine particles potentially left behind. Perhaps more notably, those oils and micro-fines can continue extracting in your concentrated brew, often leading to increased bitterness compared to paper.
So which is better? It really comes down to personal preference and the flavors you’re after. Paper delivers a “cleaner” cup with more clarity, while mesh gives you a thicker, richer texture that’s more similar to true espresso, which is also unfiltered.
My advice is to try both and see what you prefer. If you want maximum body and don’t mind a little grittiness, go with mesh. If you prioritize clarity and a smoother mouthfeel, stick to paper.
Wrapping Up: Making Espresso in an Aeropress Is a Breeze
The Aeropress offers an affordable, straightforward path to making delicious concentrated “espresso” at home. While not a perfect 1:1 replica, with some simple adjustments you can absolutely produce a rich, full-flavored beverage worthy of its inspirations. The techniques here give you total control over strength, body, and flavor notes to match your personal tastes. So grab an Aeropress and start experimenting.
Frequently Asked Questions
Can I use pre-ground coffee with the Aeropress?
While you can technically use pre-ground coffee in an Aeropress, I highly recommend grinding fresh beans yourself right before brewing. Pre-ground coffee goes stale very quickly after grinding as the oils and aromas become oxidized. With the ultra-fine grind needed for concentrated Aeropress brewing, that staleness is amplified further. Do yourself a favor and invest in a quality burr grinder; it makes a massive difference in capturing the beans’ full flavor and aroma potential. The initial cost is worth it for the increased quality in every cup.
What’s the ideal water temperature for Aeropress brewing?
The optimal water temperature for Aeropress brewing falls between 195 and 205 degrees (F), despite the company mentioning that you can brew as low as 165 degrees (F). I recommend taking your boiled water off the heat for 30 to 45 seconds after it reaches a boil, which should put you right in that sweet spot around 200 degrees (F). Using water that’s too hot can burn and over-extract the grounds, while water that’s too cold won’t extract the grounds fully, leaving you with an underdeveloped, weak brew.
How should I store my Aeropress coffee after brewing?
While Aeropress concentrate is best consumed immediately after brewing, you may have some leftover that you want to store briefly. If so, transfer it to an air-tight container or milk frothing pitcher and refrigerate. Avoid leaving it in the Aeropress chamber. Concentrate will stay relatively fresh for up to 3 days refrigerated, though it will lose some of its aroma and brightness over time. Don’t reheat concentrate in the microwave, as that can make it taste horribly burnt. Instead, gently warm on the stovetop before drinking if you want it hot.