Flair Pro 2 Review: Why This Is My Favorite Manual Lever Espresso Maker


About a month ago, I decided to up my home espresso game and purchased the Flair 2 Pro manual lever machine. I was intrigued by the hands-on process and ability to control every aspect of the shot, and I have to say…I’m really happy I bought it.
However, those first two weeks with the Flair Pro 2 were frustrating to say the least. No matter what I tried, every shot I pulled came out disgustingly sour and undrinkable. I came into it with some in-depth knowledge about the science of espresso brewing and some experience using electric espresso machines, but still, the coffee coming out was nasty.
What I eventually realized is that mastering the Flair Pro 2 has a steep learning curve, which means it’s not right for everyone. In this hands-on Flair Pro 2 review, I’ll explain everything you need to know about this manual lever machine to decide if it’s right for you.
Quick Flair Pro 2 Review
The Flair Pro 2 is a sleek, beautifully designed manual lever espresso maker that allows you to pull café-quality espresso shots at home. I’ve been using it for a month now, and I’m blown away by the quality of the espresso it produces ONCE YOU LEARN how to use it properly.
The learning curve is steep, and it took me a good two weeks of trial and error before I pulled a shot I was happy with. But once I dialed everything in, the espresso from the Flair Pro 2 has been sublime—rich and syrupy with delicious crema.
The Flair Pro 2 isn’t for everyone though. It requires time and patience to master. You’ll need a good grinder and scale, as well. And a willingness to tinker and experiment. For those who put in the effort, the payoff is incredible espresso that rivals $3,000 machines.
But if you want push-button convenience, I’d recommend you look elsewhere.
Overall, I highly recommend the Flair Pro 2 for anyone looking to make delicious espresso at home and don’t mind putting in some serious work to get there. The quality potential is incredible, and for the price, it can’t be beaten. Just know it has a learning curve. Be prepared to waste a lot of coffee dialing it in, and expect the first few weeks to be frustrating. After that, though…you’re in for some seriously delicious espresso.
Who the Flair Pro 2 Is and Isn’t For
I recommend the Flair Pro 2 for a few types of home barista enthusiasts:
- People who really geek out over espresso and want to learn the intricacies of pulling the perfect shot. The Flair Pro 2 is incredibly rewarding once you master it.
- People with some experience using manual brewing devices like pour over, French press etc. You’ll adapt quicker to the hands-on workflow. Lever machines have a similar process, and it takes me about 10 minutes start to finish to pull a shot. If you’re already used to manual brewing methods, the daily time and effort won’t be too much of a shock.
- Budget-conscious espresso lovers. The Flair Pro 2 offers unbelievable quality for the price. Expect to pay around 10 times more for an electric machine of equal capabilities.
- Anyone short on space. The Flair has a tiny footprint compared to most electric home espresso machines, except maybe the Breville Bambino. It takes up barely any room on my countertop.
The Flair Pro 2 is NOT for:
- Complete beginners who have never made espresso before. The learning curve is quite steep. I’d start with an entry-level electric machine first to understand the basics of espresso brewing.
- People who want convenience and ease of use. Making espresso on the Flair takes effort and practice to learn, and even after that, it takes about 10 minutes of active work to pull a single shot. You have to embrace the process.
- People who don’t enjoy tinkering or dialing in brew parameters. To get great shots, you need to master variables like dose, grind, flow rate, puck prep, and more. It takes trial and error.
Flair Pro 2 Pros and Cons
Pros
Flavor clarity and balance is incredible
The steel brew head retains heat extremely well
Total control over pressure and pre-infusion for maximizing extraction
Compact size takes up minimal counter space
Gorgeous, premium design will elevate any countertop
Unbeatable quality for the price point
Cons
Steep learning curve
Requires about 10 minutes to pull a shot
Smaller 46mm portafilter requires more puck prep precision
Need to hold base stable when pulling shots due to lightweight materials
No automation like electric machines
Flair Pro 2 Review
Below I’ll go through the various aspects of the Flair Pro 2 that I think are most important to consider before buying, and I’ll give my thoughts on each.
Appearance
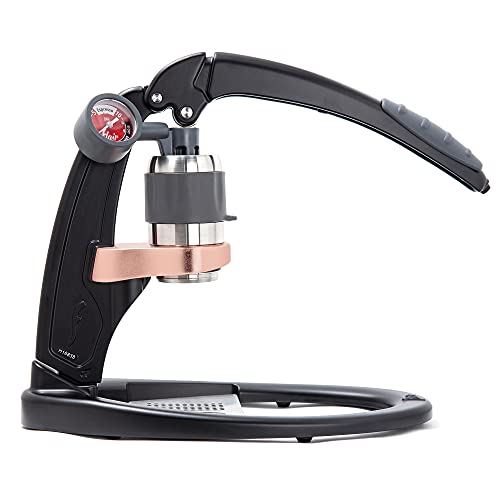
The Flair Pro 2 is one of the most aesthetically pleasing manual espresso makers out there, in my opinion. The matte black metal finish looks sleek, especially paired with the polished rose gold highlights. It’s a machine I’m happy to leave out on the counter rather than tuck away.
The fit and finish feel premium overall. The metal parts have a nice heft to them that inspires confidence. Especially the brewing chamber, which is solid, thick stainless steel. The tamper is also hefty, which I like. It’s small, but I have big hands, and it’s no problem to use.
If you care about having an attractive machine, the Flair Pro 2 might be ideal for you. It’s compact but eye-catching. I get compliments from guests frequently.
Ease of Use
This is where the Flair Pro 2 gets tricky. Making espresso is inherently difficult—there are so many variables and tiny nuances that affect flavor. With the Flair Pro 2, you manually control all of them, so there is a steep learning curve.
Here’s an overview of the workflow:
- Start heating water. When you get to around 200 degrees (F), you can use the water to start pre-heating the brewing chamber. I pre-heat with the portafilter on so that everything gets nice and hot. Then I’ll empty it, take the portafilter out for dosing, and refill the brewing chamber with the included silicone cover to maintain a good temperature.
- Grind coffee with your grinder (not included, and you’ll need a high-quality coffee grinder capable of good consistency for espresso).
- Dump the grinds into the portafilter. The portafilter is 46mm, which is smaller than the 58mm portafilters most commercial espresso machines (and the Flair 58) use, but you can use the included dosing cup to get them in there without too much of an issue.
- Distribute grinds evenly using a tool like a WDT prep tool. Precise distribution is key. Mess this up and shots taste channel-y. This tool is also not included, but they’re affordable. You can also make your own using acupuncture needles and a wine cork.
- Tamp evenly at proper pressure. THIS is where I struggled most with the Flair Pro 2. Since the portafilter is smaller than usual, the tamping pressure needs to be a little lighter. With a standard 58mm portafilter, you literally can’t tamp too hard. The slimmer portafilter on the Pro 2 means the puck is thicker, which means tamping too hard creates too much resistance when you go to brew. At the right grind size and with a full-force tamp, I kept getting shots that just wouldn’t pull. You need to get used to the right tamping pressure, and that takes a lot of practice.
- Empty the brewing chamber that’s pre-heating and attach the portafilter. Don’t forget the puck screen (included). WIthout that, your grounds will start floating and lose their compression.
- Position your espresso cup and pull the lever down with just a little pressure—around 1 bar on the gauge. Hold it there for 5 to 10 seconds for the pre-infusion.
- Next, slowly add pressure until you get to around 8 or 9 bars. You can play around with pressure profiling as you see fit, but I recommend sticking to the basics while you’re learning. One thing I didn’t realize when I first started is that the Flair Pro 2 takes a bit longer to brew than a standard machine. Since the portafilter is slimmer and the puck is thicker, you should aim for between 45 and 55 seconds as opposed to the 25 to 30 seconds with an electric machine.
It took me two weeks of trial and error dialing in the right grind size, dose, distribution, tamping routine, and pull technique to get tasty, balanced shots. Little changes make a big difference. I eventually got great results, but it was frustrating at first. If you’re into tampering, don’t get discouraged. It’s incredibly rewarding once you get it right, and the coffee quality cannot be beaten, especially for the price.
Coffee Quality
Once I finally dialed in the Flair Pro 2, the espresso quality blew me away. Rich, thick, syrupy mouthfeel with lovely sweetness and complexity, and aesthetic, delicious crema. Better than most coffee shops.
The hands-on process lets you perfect every variable to tease out the best from the coffee. I have more control over temperature, pressure, and flow rate than on my old semi-auto machine, and I paid significantly more for that!
I’m pulling incredibly balanced shots with pronounced flavors every morning now. The manual pre-infusion helps develop body and crema too. If you love ultra high-quality espresso, the Flair Pro 2 delivers. It’s incredibly rewarding once you master it.
Counter Space and Footprint
A major plus for the Flair Pro 2 is its small size. It takes up way less space than an electric machine.
The base is just 4.5 inches wide by 10 inches deep. It easily fits in a small corner of my countertop.
And the included carrying case with custom foam cutouts makes it really easy to pack up out of sight if needed. The minimal footprint is perfect for small kitchens or apartment living. Way better than bulky electric machines.
Price
Priced at around $300, the Flair Pro 2 offers tremendous value. The price does change, so make sure to check the current price on Amazon. To get equivalent performance from an electric espresso machine, you’d likely spend well over $3,000.
It’s markedly cheaper than comparable manuals like the Cafelat Robot ($450+) and the La Pavoni Professional ($1,500+). For the quality potential, the Flair Pro 2 is an incredible bang for your buck, and I honestly don’t think you can beat it right now.
Just factor in the added cost of a good grinder and accessories. You’ll want to budget $500 to $600 total to get set up. But compared to electric machines that cost thousands and still can’t match the Flair’s shot quality when dialed in, the Flair Pro 2 is very budget friendly.
The Flair Pro 2 gives you world-class espresso capabilities at a fraction of the price of high-end electric machines. It’s an amazing value purchase.
Build Quality
The Flair Pro 2 feels reassuringly sturdy and durable in daily use. Both the base and detachable brew cylinder are made of solid steel with some nice heft.
After a month’s use, mine still looks and functions like new. The metal parts show no signs of wear and feel built to last.
My only complaint is the plastic gauge. I’d prefer a metal gauge instead, but I get why Flair Espresso went this route. The gauge is the most likely part to fail over time, so, by making it a cheaper plastic version, you can more affordably replace it. Flair sells individual replacement parts on its website, including the gauge. I think aside from the gauge, the only thing that will probably EVER wear down are the O-rings, which are also super affordable.
Overall the Flair Pro 2 is clearly built well. With proper care and maintenance, it should provide many years of flawless performance. I have no concerns with longevity based on my experience so far.
Warranty
Flair offers a 5-year warranty on certain components of the Flair Pro 2, including the following:
- Stand
- Brewing cylinder
- Plunger
It also offers a 1-year warranty on the following:
- O-rings
- Dispersion screen
- Piston stem
- Silicone insulation sleeves
- Portafilter
I would strongly suspect that all of these components will last much longer than their warranty period.
The warranty is excellent for the price point. More expensive espresso machines often come with 2- to 3-year all-inclusive warranties but cost many times more, so I think 1 to 5 years is more than fair for this affordable machine.
By all accounts, Flair has great customer service if you did need to make a warranty claim. But expect the Flair Pro 2 to keep working well beyond the warranty term as long as you take care of it properly and keep it clean.
The Bottom Line: Do I Recommend the Flair Pro 2?
The Flair Pro 2 is an exceptional manual espresso machine capable of truly amazing coffee with practice. If you love the craft of espresso and enjoy the hands-on process, it’s incredibly rewarding to master.
But if ease of use is a priority, you may be happier with a semi-automatic espresso machine. The Flair Pro 2 requires time, patience, and a willingness to learn through trial and error. If you don’t love to tinker and learn about the science of coffee brewing, the Flair Pro 2 might not be for you.
For intermediate home baristas who want high-end espresso for a fraction of the price though, I can’t recommend the Flair Pro 2 enough. It’s beautifully designed and can make coffee that’s as good as the best cafes once dialed in. And for those people, I think the Flair Pro 2 is the best manual lever espresso maker you can buy.
Frequently Asked Questions
Does the Flair Pro 2 require a lot of effort to use daily?
Yes, the Flair Pro 2 does require much more effort than an electric espresso machine. You have to grind your coffee, distribute, prep the puck, tamp, preheat the brew head, pre-infuse, then pull the shot using some muscle. There is a learning curve to mastering the process and workflow, and it’s nowhere as simple as pushing a button. But for many enthusiasts, the hands-on process is rewarding once you learn it.
How big of a footprint does the Flair Pro 2 take up?
The Flair Pro 2 has a very compact footprint, especially for an espresso machine. The base is only 4.5 x 10 inches, and the brew cylinder detaches when not in use. It takes up minimal counter space and can easily fit in a small kitchen. The small size makes it perfect for use in RVs, small apartments, or for travel. It even comes with a convenient travel case for taking it on the go or packing it up when not in use.
What grinder do you recommend for the Flair Pro 2?
I recommend investing in a high-quality burr grinder for the Flair Pro 2. I personally use the Lido 3 from Orphan Espresso, but options like the Baratza Sette 270, Eureka Mignon, or Breville Smart Grinder Pro are excellent choices if you’re looking for an electric grinder. You need a grinder that has precise grind size adjustability and can grind fine enough for espresso’s requirements. Blade grinders won’t cut it for optimal Flair Pro 2 performance.
How long does the learning curve take to master the Flair Pro 2?
It took me about 2 weeks of daily use before I really mastered the workflow and dialed in the Flair Pro 2 to pull amazing shots consistently. And keep in mind that I came into the Flair Pro 2 with a deep knowledge of espresso brewing and experience using many different electric machines. Expect a lot of trial and error and wasted beans in the beginning. Have patience, start with basics, and focus on improving technique. Once it clicks, you’ll be making incredible espresso at home.