Keurig Coffee Grounds in Cup: Why It’s Happening and How to Fix It

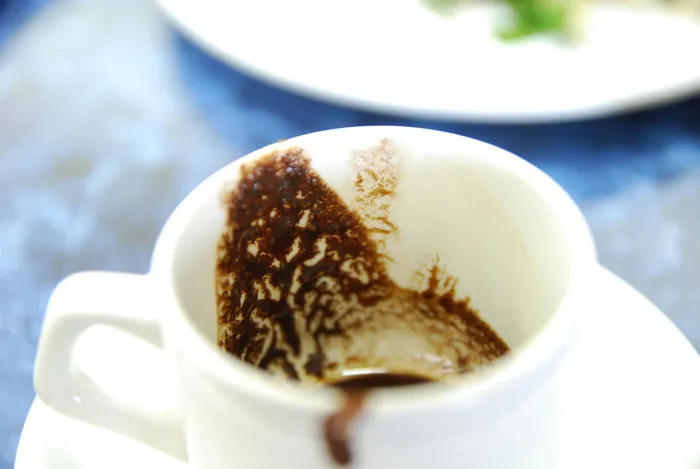
There’s nothing worse than taking a sip of coffee in the morning and getting nasty, burnt grounds in your mouth. No one wants to chew their coffee. Keurig machines and other filtered coffee makers are usually pretty good at leaving your cup free of grounds, but if you notice Keurig coffee grounds in your cup, it’s time to find a solution and get back to your regularly scheduled cup.
In this guide, I’ll explain the four reasons I’ve found that can cause Keurig coffee grounds in your cup, and I’ll include simple solutions for each underlying problem.
Why Are There Keurig Coffee Grounds in My Cup?
There are a few reasons you may be getting coffee grounds in your morning cup of joe from your Keurig machine. The good news is that, in most cases, the issues can be easily identified and remedied so you can get back to enjoying your daily dose of caffeine. I’ll explain the most common causes and solutions in the following sections.
1. Your K-Cup Is Faulty
One of the simplest potential issues is that the K-cup you used is faulty or not compatible with your particular Keurig model. K-cups contain a filter built into the plastic cup itself. If this filter gets damaged during manufacturing or shipping, it can allow grounds through into your brewed coffee.
If you notice grounds after using just one K-cup, it’s likely that cup itself was defective. Try brewing with a different cup from the same package. If you don’t get any grounds, you can safely assume the first cup was faulty.
Keep in mind that the likelihood of faulty K-cups is higher with some third-party manufacturers. Keurig, Dunkin, Starbucks, Donut Shop, Green Mountain…you should be fine with these. But some of the more unusual ones might give you repeated problems. If you notice grounds in multiple cups in the same package or brand, it’s possible the entire batch is defective. In that case, switch K-cup brands and see if the issue persists.
Some third-party or off-brand K-cups also may not have filters that work properly with certain Keurig models. If switching cups solves the problem, make note of which brands work in your machine and steer clear of the ones that don’t.
2. Your Needles Are Clogged
Keurig machines use two pointed needles to puncture the K-cup—one at the top to deliver hot water in, and one at the bottom to allow the brewed coffee to flow out the bottom and into your waiting mug. Over time, these needles can become clogged with coffee grounds or mineral deposits from your water.
Clogged needles disrupt the brewing process. If the bottom needle gets clogged, the incoming water from the top has nowhere to go. The K-cup fills with water and pressure forces everything out the top, bypassing the filter and dumping grounds into your coffee.
And sometimes you’ll even notice water not coming out of your Keurig machine, which leads to built-up pressure, which leads to water and grounds exploding out of your machine. Yea…it’s not pretty. Especially at 6am to start your day. Speaking from experience here.
To fix clogged needles, you’ll need to decalcify your Keurig to dissolve any built-up mineral deposits. Fill the water reservoir with equal parts water and white vinegar, then run a brew cycle. Rinse by running two cycles with just fresh water. You could buy a descaling solution, as well.
You can also use a straightened paper clip to gently clear any clogs or coffee particles from the needle openings. Be careful not to scratch or damage the needles themselves. They are particularly prone to bending.
Related Article: Keurig Won’t Stop Pumping Water: Why It Happens and How to Fix It
3. The Needles Aren’t Puncturing Properly
In order for everything to work correctly, the top and bottom needles on your Keurig must fully puncture the K-cup when you close the lid and start brewing. If the bottom needle doesn’t make it all the way through the plastic cup, the water from the top has nowhere to go. The cup fills and overflow occurs out the top, bypassing the filter and leading to wet grounds in your coffee.
To check for faulty needle punctures, open the lid after you finish brewing and remove the spent K-cup. Examine the top and bottom of the cup. You should see two neat, round puncture holes where the needles went in. If the holes look off-center, too small, or aren’t there at all, you likely have a needle issue.
Bent or damaged needles can prevent full puncture. Over time and repeated use, the thin needles can get bent out of place. Remove the needles and visually inspect them, then try gently bending them back into proper position using needle-nose pliers. If the damage is too severe, replacement needles can be ordered online or directly through Keurig.
If you’re under warranty, Keurig might fix the issue for you, but you’ll need an alternative solution for making coffee until you get your machine back.
Related Article: Keurig Not Heating: What’s Causing the Issue and How to Fix It
4. The Top Seal Isn’t Sitting Properly
There is a rubber gasket around the top needle in Keurig machines that seals against the foil lid on K-cups when you close the brewer. This prevents water and grounds from escaping out the top. If this gasket becomes dislodged or wears out, it can’t form an airtight seal during brewing. The result is backflow out the top of the K-cup and water and grounds in your cup.
To fix this issue, open the lid of your machine and inspect the gasket on the top needle. It’s tiny and black, so you might need a flashlight to see it.
Make sure it is seated properly in place around the needle. You can try removing it, cleaning it, and firmly pressing it back into position. If it looks cracked or worn, replacement gaskets can be purchased online or through Keurig. Proper seating of the gasket is key for keeping grounds out of your morning coffee.
Wrapping Up: Getting Rid of Keurig Coffee Grounds in Your Cup
Getting a mouthful of wet grounds when you’re expecting a smooth cup of coffee is never a great way to start the day. But in most cases, Keurig coffee grounds in your mug can be remedied with some easy troubleshooting and maintenance.
Check for faulty K-cups, clear clogged needles, inspect the puncture process, and ensure your brewer’s gaskets are seated properly. With a few quick fixes, you’ll be back to enjoying your favorite caffeinated beverages ground-free.
Frequently Asked Questions
Why does my Keurig brew weak or watery coffee?
This is often caused by old, stale, or low-quality coffee pods. Try using fresh pods from a reputable brand. Also ensure you are using the correct pod for the brew size selected. Using a small pod on a large brew setting will result in weak coffee. Descale your machine regularly as mineral buildup can affect water flow and flavor. Unfortunately, Keurig machines tend not to make the best coffee, so you might just not like Keurig coffee. Consider another brewing method. Nespresso makes single-serve coffee machines that produce better coffee, in my opinion.
How can I make my Keurig coffee hotter?
The default brewing temperature on most Keurig models is 192°F, but you can increase it to 197°-200°F for hotter coffee. Carefully remove the lid, locate the internal thermostat, if there is one, and gently turn the dial clockwise until you reach your desired temperature. Replace the lid securely before brewing. Be careful not to overheat or you may damage your machine. If you don’t have an internal thermostat, try putting hot water into your brewer to start and then running your machine. This should produce slightly better results.
Why is my Keurig leaking water?
If your Keurig is leaking water from the bottom, this is commonly caused by improper pod puncturing, missing or worn gaskets, clogged needles, or a loose water reservoir. Inspect your brewer for leaks during the brew cycle. Try cleaning the needles, replacing gaskets, and ensuring the pod holder closes completely. Make sure the water reservoir is firmly in place. If leaks persist, contact Keurig support.
How do I descale my Keurig brewer?
Descaling your Keurig machine regularly removes mineral buildup that can lead to a whole slew of issues. Fill the water reservoir with equal parts white vinegar and water. Place a large mug under the dispenser and brew a full cup, then repeat. Finally, brew 2 to 3 cups of plain water to rinse the vinegar. Wipe down the machine and rinse the water reservoir thoroughly after descaling. Descale every 3 to 6 months.